
The Forgotten Scottish Battles of 1685
In May 1685, the Earl of Argyll invaded Scotland as part of a coordinated invasion to restore the Liberty and Religion of the British Isles. The campaign was not bloodless with two now forgotten Battles taking place and many more skirmishes. The Battle of Ardkinglas was fought on June 12, and the Battle of Muirdyke on June 18. The results will make you rethink your view on this campaign.
How did Argyll’s Campaign start?
The Earl of Argyll’s fleet of three ships contained 300 soldiers, and arms for 10,000 men. After sailing from Holland on 2 May they had reached the Murray Frith in Scotland on May 5, 1685. From here the fleet headed north to the Shetland Isles, arriving the following day. Hoping to send messages to his supporters the Earl sent two men ashore, unfortunately they were identified and arrested. In an attempt to rescue his men Argyll took hostages from a nearby village but after two days Argyll left the Isle’s and headed west. The race was now on before word reached Edinburgh of his arrival. By the time Argyll reached Dunstaffnage to light the fire cross, on May 15, a Scottish Army of 20,000 was being mobilised to be commanded by the Earl of Dumbarton.

At Dunstaffnage, Argyll sent his son Charles across the mountains to raise the clans, while he took the fleet south. After chasing off Government forces from Islay, Argyll reached Campbeltown on May 20, with an enlarged fleet, but still lacked recruits. During the day, the Whigs set up a printing press, and as soon as the ink was dry, the Whig Declaration of War was first read to the crowd. Then messengers carried the fresh sheets of paper out across the Scottish Highlands and into the Lowlands. Unfortunately, the expected Whig recruits still did not appear, but his son had more luck rising nearly a thousand men to join forces with his father at Tarbert. It was here on May 26 that the Whig Army of 1,800 was modelled into three Regiments of infantry and a Squadron of dragoons. After raiding the coast around Largs, the Whigs landed on the Isle of Bute on May 29, 1685.
Dumbarton assumed command of the Scottish Army on May 25, 1685 and was quick to order his combination of regulars and militia to stand-off from Argyll. The closest Government Army was under the Marquis of Atholl at Inveraray, and by May 31, this numbered nearly 5,000 with a core of 300 to 500 regulars. While heading south-east from Aberdeenshire was Lord Gordon with after force of possibly 3,000 to cut-off Argyllshire. The next force, under Dumbarton himself, contained soldiers from the Scottish regiments and the Ayrshire Militia, again close to 3,000. Finally, five Royal Navy warships were heading to the River Clyde to blockage the Whigs.
Where were the first Skirmishes?
After sailing round Scotland, Argyll had established himself on the Isle of Bute and was planning his next moves. At the Army council of war, the Earl had pushed for a rapid advance on Inveraray, but others pressed for an assault on Ayrshire. Therefore, it was proposed that two raids to gather intelligence and supplies. The first was sent onto the Cowal Peninsular under his son Charles Campbell, the second was to sail up the Clyde to Greenock and would be commanded by Sir John Cochrane.

The young Campbell’s party landed under Eilean Dearg Castle and advanced up the valley to the Village of Glendaruel. While the Whigs force of about 100 soldiers gathered recruits and provisions, word reached the Government forces at Inveraray of their activity. The commander, Atholl ordered a detachment of 300 under Captain Mackenzie to investigate and engage the Whigs. Around midday on June 2, Campbell’s pickets spotted the Government forces advancing down the valley and withdrew from the village. However, Mackenzie’s 100 horse quickly caught up with the Whigs, forcing Campbell to deploy his soldiers in a defensive position along the road to Eilean Dearg Castle. The ensuing firefight lasted until the Whigs started to run out of ammunition, forcing Campbell to withdraw back to their boats at the Eilean Dearg Castle. Seeing his opportunity, Mackenzie’s horse quickly followed-up, killing two or three Whigs and capturing four more before the boats set off. After leaving a garrison at the castle, Campbell returned to his father on the Isle of Bute. Meanwhile Mackenzie retired back to Inveraray with his prisoners.
After his son returned with the news that Atholl’s men were close at hand, and the information that Carrick Castle had been destroyed, Argyll needed to retaliate. Later that day, he resolved to take the war to Atholl and the Government. His first act was to remove the furniture from Rothesay Castle, and then set fire to the castle itself. Then he returned to the fleet and sailed across to Castle Toward and waited for the return of Cochrane’s expedition.

Late on the evening of June 2 the second Whig detachment of 100 men under Cochrane sailed up the Clyde towards the small port of Greenock. The following morning, as they approached the beach, they could see a strong party of Militia cavalry coming towards them. Cochrane sent a dozen musketeers, under Major Fullerton, ashore to hold the landing ground. One of the small Whig warships provided covering fire to Fullerton while his soldiers took cover in a little yard. The Major had sent the boats back for more men, when a dozen Militia appeared under a flag of truce. To buy time, Fullerton agreed to talk, but these became heated and quickly broke down. As the Militia withdrew, they shot their pistols at Fullerton, and his men returned fire, wounding one of the Government troopers. It was now that the rest of the Militia appeared to engage in a brisk firefight. As more boat’s arrived and re-enforcements joined Fullerton, and the more ships guns opened fire on the Government soldiers they broke and fled away from Greenock. With the beach head secured, Cochrane landed the rest of his men and they entered Greenock. After sending messengers south and taking some stores, the small fleet made its way back to Bute. The first blood of the Monmouth Rebellion had been spilt.
Argyll’s next move was to move his headquarters to a stronger location while he waited for news from Monmouth. After reconnoitring the coast, he selected the Cowal Peninsula, with Eilean Dearg Castle at one end and the Castle at Ardkinglas at the other. Argyll moved his Army camp to Glendaruel and turned Eilean Dearg into a fortified arsenal by building a new battery facing out to sea. By 7 June, his base of operation was secure, and his attention returned to Inveraray, sending Colonel Rumbold north to Ardkinglas with a Regiment of Foot and two troops of Horse. As Rumbold reached Ardkinglas, three Royal Navy frigates and two yachts blockaded the entrance of Loch Riddon in sight of Eilean Dearg. On 11 June, Atholl reacted to the Whig move north and ordered Mackenzie to block the road from Ardkinglas to Inveraray.

What happened at the Battle of Ardkinglas?
On the morning of 12 June 1685, seeing the Whigs at Ardkinglas, McKenzie ordered a boat to cross the Loch and scout out their positions. As this vessel approached the shore, Rumbold sent out his own boat and a troop of Cavalry to intercept the Government scouts. The larger Whig boat forced the scouts to the shore where they took up a defensive line within a small enclosure. From across the Loch, McKenzie saw the danger his men were in and sent his own horse out to rescue his scouts. As the morning unfolded, Rumbold ordered a company of infantry to intercept the Government cavalry. With his scouts and cavalry being chased back to his camp near Clachan Kirk, McKenzie deployed his small Army of 300 into line blocking the Inveraray road and sent a messenger back to Atholl asking for reinforcements. Meanwhile, with word that Argyll was only a few hours away with the rest of the Army, Rumbold advanced his whole Whig Army of 500 around the Lochhead to attack the Government line. The first Battle of the Monmouth Rebellion was under way.

McKenzie’s front was no more than 250 yards wide and placed his troop of Horse on the Loch shore, anchoring his right flank. His battle line then extended along a stream up to the Kirk that rested on the top of the rise under the mountain crags. Within the walls of the Kirk, a Section of Highlander Watch held the left flank. Facing this defensive line, Rumbold anchors his right and left flanks with his troops of horse, in the centre his three companies to foot advanced to engage the Government line. With the Loch on his left and the crags on his right flank, Rumbold’s Whig cavalry dismounted and attacked the Kirk, pushing back the Highlanders. In turn, McKenzie pulled his line back to the next rock-strewn stream. Once more the Whigs had to assault the Highlander musketeers in a strong position. Each time the flank was broken the Government pulled back to the next defensive line, with their left flank covered by craggy streams.
Rumbold’s men were starting fatigue when a fresh company of Whig infantry arrived from Argyll main Army. Rumbold threw these new soldiers into the fight on the left flank hoping to break the Highlanders and encircle McKenzie’s smaller force. As the Government force had been pulling back a gap had started to grow between McKenzie’s centre and left wing. However, two new companies of Highland Watch arrived, and McKenzie placed these on the high ground and amongst the crags on his left flank. As the Whigs soldiers once more pushed back the Highlanders, the Government line pulled back, but this time they had broken through the defensive line. As the Whigs advanced in triumph hoping to trap their enemies, McKenzie fresh Highland struck hard, charging into their disorganised and exhausted foes. It was now time for Rumbold to pull back, turning attack in defence, and pulling back from stream to stream.
By now Argyll had brought up the bulk of the Whig Army allowing Rumbold to pull back into the fresh battle line. It was late in the day and Argyll saw no advantage at pressing on that evening. His men had marched hard all day and fighting at night in rough ground could cause disaster. However, McKenzie made one last attempt to break the Whigs. Once more he loaded boats up with soldiers and sent them across the Loch hoping to cut the Whigs line of communications. As they approached the shore, the Whig rear guard were waiting for them and opened fire, while fresh boats entered the Loch from Ardkinglas. Overwhelmed, the Government boats fled down the Loch towards Inveraray. As his boats sailed away, McKenzie ordered his Army back towards Inveraray, leaving the Whigs in control of the battlefield. That evening the Whigs camped at Loch Fyne head and celebrated their victory. They now controlled the Inveraray to Glasgow and the road into the central highlands.
What happened at Eilean Dearg Castle?
The evening of 12 June, saw Argyll and his Whig Army celebrating their victory at Ardkinglas. However, things had not gone to plan at Eilean Dearg Castle. The three Royal Navy frigates dominated the entrance to Loch Ruel and were visible from the Castle. The Whig gunners had fired the odd pot shot, but the balls just bounced off the warship’s solid hulls. With the castle full of arms and ammunition it was clear that they would soon try to capture the stronghold. That night Argyll left the celebrations taking the horse and as many volunteers as possible south. The Earl arrived in time to see the Navy ships within cannon shot of the castle, but still the other side of the shallows at the Loch mouth. Looking to seize the moment, Argyll ordered his fleet to be ready for war, and sent his men into the flotilla of small boats. His plan was to send his larger ships forward to draw the enemy fire, while the smaller boats full of soldiers could board and overwhelm the warships. However, his Dutch sailors refused to move stating they hadn’t been paid to fight. Without his fleet, Argyll was forced to abandon his attack.

Leaving a foot company at the Castle, Argyll ordered his army to march east that night. The following morning his men start crossing Loch Long, to reach Garelochhead that night. Behind him on the Cowal, Atholl had advanced to Glendaruel with his vanguard and on 15 June, the Royal Navy warship entered the Loch and made ready to bombard Eilean Dearg Castle. After the fire shot, under a white flag, a small boat rowed out to the flagship. Onboard were the hostages taken on Orkney, five weeks earlier. They told the Captain that the Whigs had fled but had lit a fuse into the magazine. Not wasting a moment, a landing party was sent across to the Castle just in time to extinguish the fuse, saving the fleet from disaster.
From Garelochhead, Argyll’s took his men across the hills to the River Leven and that night they crossed onto the eastern bank to camp near Bonhill. In the morning, cold and hungry the Whigs continued the march east hoping to bypass Glasgow and reach Stirling. However, a patrol from the Government forces had spotted the Whig movement and sent a warning to Dumbarton at Glasgow. The Scots General saw the danger and took his Cavalry north, ordering his Infantry and Artillery to follow. Argyll had spotted the Government forces moving to intercept his move east and deployed his men to face the oncoming foe near Killearn. On the night of 17 June, the Whig Army had shrunk to under 1,000 soldiers, to be faced by a force of over 1,500 Government troops, including light Artillery. Although the ground was good for defence, the Whig leaders agreed to a night march to the ferry over the River Clyde at Old Kilpatrick.
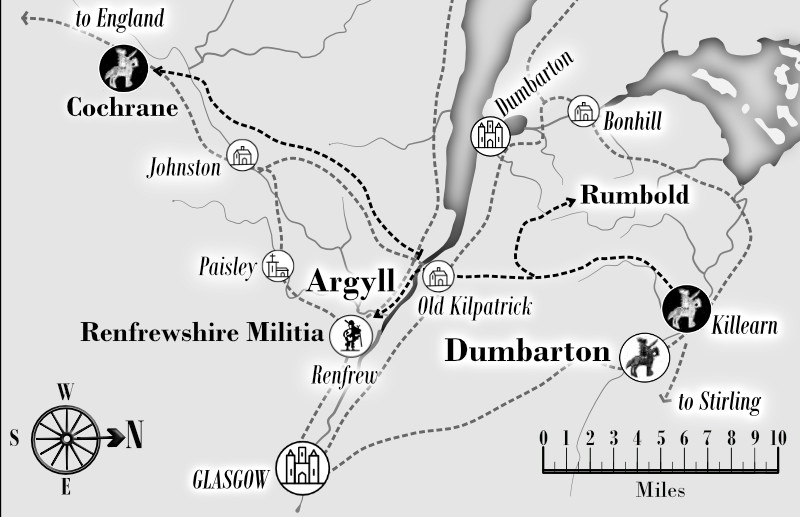
The Whig lit campfires and posted vedettes, while across the valley the Government forces stood at their arms anticipating a night attack. Argyll ordered men to form up leaving Rumbold and what remained of the cavalry as the rear-guard. While the vanguard was led by Cochrane, with the volunteer companies. As they crossed the hills, gaps appeared in the ranks as the vanguard pressed forward, these were exaggerated by some taking the opportunity to slip away. At the rear Cochrane’s cavalry became lost as they missed the path taken by the others. By the time Cochrane reached the outskirts of the Old Kilpatrick, the column behind him was ragged and disintegrating. However, ahead was the ferry and after rushing the Militia guarding the crossing, Cochrane took two boats across the river to seize the south bank. Under heavy fire, the Whigs captured the ferry bridge and created a bridgehead. Unfortunately, on the north bank the Whig Army had lost all cohesion with soldier pillaging houses for food, and others totally lost in the hills, including Rumbold and all the cavalry. With disaster close at hand, Argyll gave the order that every man was to fend for himself. Then with a small party of friends and his son, Argyll crossed the Clyde and headed towards Renfrew, aiming for Glasgow.
What happened at the Battle of Muirdyke?
Cochrane had around 150 veteran soldiers in the bridgehead and after talking to the other officers they agreed to march south to join Monmouth. However, as they prepared to move off, Militia Horse appeared, forcing Cochrane to deploy his force on a low ridge, using a hedge row as cover. With the sun now up, Cochrane needed to make haste, so he ordered his men to attack the Militia. As the Whigs advanced down the hill, their enemy turned around and galloped off to Renfrew. This allowed Cochrane to march off in good order. By using the doves and cattle tracks the Whigs made good time and as they marched, men slipped away forcing Cochrane to stop. He now had 80 soldiers, all well-armed and experienced. Cochrane made them all swear to stand by each other, rather than flee. They then set off once more.
Before sunrise on 18 June, it became clear to Dumbarton that the Whigs had disappeared. Ordering his infantry back to Glasgow, he sent out his cavalry in every direction to locate his enemy. One detachment under Major Ross headed south towards Glasgow, and Renfrew. Here he received notice that a large body of Whigs had been seen heading south. Adding two Militia Horse troops to his existing force of one Cavalry and one Dragoon troop, Ross cantered off on the heels of his enemy. By late afternoon, his scouts reported seeing the enemy some five miles ahead. The chase was on, and as they came with a mile of the Whigs, he could see an opportunity to cut them off. After ordering Captain Cleland to take his dragoons and the Militia after the enemy, Ross took his troop off the road and across the hills.
Cochrane had seen the enemy horse hot on his trail and made the decision to secure a strong position to camp overnight. Close at hand was the perfect location, and he ordered his men to head to a small hill surrounded by walls called Muirdyke. As they scrambled up the hill, Ross’ cavalry appeared on his left flank. As the Whigs quickly formed a firing line, the Government horse came cantering towards them. In normal circumstances, the outcome would be the destruction of the infantry. However, Cochrane’s men stood firm, forming a tightly packed body and after receiving the pistol shots from the cavalry, they returned fire and then picked up the polearms they had close at hand. Rather than the infantry breaking, the cavalry passed around them and pulled up behind them in disorder. Cochrane took the opportunity and raced to the hilltop, where his men took up a defensive line.
Ross reformed and ordered the newly arrived Dragoons into the attack. Placing these on the right, he advanced on the left. The cavalry cantered in firing pistols and attempted to cross the ditch and wall that surrounded the Whig position. However, their enemy fire moved devastation volleys into the troopers, then counter-attacked the cavalry. Ross’ men were beaten back, with the loss of Captain Cleland. The Government horse pulled back once more and waited for the Militia Horse to form-up. The Whigs were surrounded, with Ross on the level ground, the Dragoons in the centre dismounted, while the two troops of Militia would attack opposite Ross’ men.

On the hilltop, Cochrane could see the danger and deployed his men to counter the threats from Ross and the Militia. However, he only left a few musketeers and the wounded to hold back the dragoons. As the Government cavalry attacked the fighting over the walls became vicious. The Whig held their ground, but Ross now sent detachments around their rear. However, these troops found the ground hard going in the small wood. This gave Cochrane’s time to redeploy some soldiers to face the new challenge. On Cochrane’s left, his men broke the Militia Horse and they turned to face the new threat. Not waiting to reload, the Whigs charged downhill into the cavalry, breaking them. Meanwhile, Ross had been injured and his men were wavering, only to be overwhelmed by the victorious Whigs. In the centre the dismounted Dragoons had been attempting to infiltrate the position, but Whig fire had slowed them down. As Ross’ cavalry pulled back, Cochrane charged the Dragoons. See all hope lost they ran to their horses and pulled back out of musket range.
The Whigs may have won the battle but as night drew-in they were exhausted and surrounded. There was no doubt that at sunrise they would be attacked by fresh Government infantry, possibly even artillery. Cochrane told his men to ready themselves for a break-out. His men then reaffirmed their oath to stay with each other before heading out into the night. With weapons ready they moved quietly towards the Government line, only to find that the troopers had disappeared. Somewhat surprised, Cochrane headed south to find somewhere safe to hold out. Finally, after a long night march they found somewhere secure. During the day they watched Government units heading south on their trail. After two days, with the Whigs only moving at night, Cochrane learnt that Argyll and Rumbold had both been captured. Seeing the game was up, Cochrane dissolved the soldier’s oath, and each man was free to make his own way to freedom. The Monmouth Rebellion in Scotland was over.
This account is based on a more detail description of Argyll’s campaign in Scotland is available from Helion & Company in my Book Fighting For Liberty.